The spherical or hip joint must be protected from wear because important motor functions depend on it. To protect it, you should perform special exercises to strengthen the muscles around these joints. Usually, this is a simple set of exercises that is easy to perform at home. Such training does not cause pain and perfectly helps with stretching the ligaments and legs.
What are the benefits of hip stretching?
The flexibility and mobility of these joints provide:
- Motor activity in this area;
- Normal blood circulation in the pelvis and legs;
- Reduction of pain and stiffness in the lower back;
- Prevention of salt deposits.
Therefore, regular stretching of the ligaments and muscles of the hip region, as well as the development of joint mobility help to avoid various pathological processes. At the same time, light training will be useful for maintaining a healthy body for many years.
Workout for the development of the hip joints and stretching of the legs
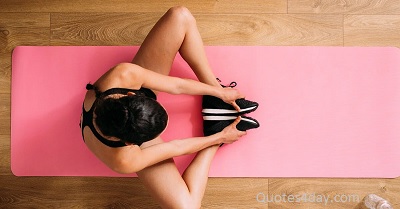
Let’s look at simple exercises for stretching and strengthening the hip joints with Anastasia. You can easily repeat them at home, just lying on the floor. You will need a yoga mat to complete the exercises.
Exercise 1
Starting position – lying on the rug. Gently lie down on your back through the roll and first adjust your breathing: take a deep breath, expanding the lower ribs and contract as you exhale, slightly pressing them to the mat. Repeat for a few more breaths. Let the shoulders be deployed, the collarbones “smile”, and the hands are pressed to the mat.
With the subsequent exhalation, slightly push the mat away from you and tilt the pelvis to the navel, and with an inhalation, pull the mat towards you and tilt it to the other side. Thus, an exercise called “Pelvic Clock” begins :
- Do light rolls of the pelvis, imagining that you have a “dial” on your stomach: where the navel is, it shows twelve, and in the lower abdomen – six.
- Move very easily, as if you have no muscles, only due to the feet, so you pushed off – the pelvis tilted, pulled up – the pelvis tilted to the other side.
- Be sure to move with your breath and try not to raise your pelvis above the mat, only light rolls. Do a few more breaths.
This exercise is very useful for the mobility of the pelvis, especially for the lumbar region. It relaxes the area, improves blood circulation, and sometimes even relieves pain, but for this, it is important to completely relax. Therefore, do not strain the press, buttocks, or hips, work only with your feet.
Exercise 2
Next exercise:
- On the “dial” change direction at three and nine o’clock, that is, to the left and right bones.
- Do light rolls, alternately pushing off with your right and left feet.
- Breathe freely, inhale, and exhale in any direction.
- Leave your shoulders wide apart, and press your hands to the mat.
Exercise 3
Fix the starting position:
- Take a deep breath, exhale, and with the next breath, begin to tilt your left leg towards the edge of the foot, leaving the pelvis motionless.
- With an exhalation, straining the abdominal muscles, pull the leg up with effort.
- Also, work on the other side: inhale – and open in the hip joint, exhale – pull the leg back.
- Yes, in turn, each leg, but make sure that your pelvis does not “run away” behind the leg.
Your task is to work only in the hip joint, leaving the pelvis motionless. Imagine that the leg is lowered into a viscous substance, for example, honey, and you lower the leg with an effort and, under the force of gravity, fall even more and also raise it to its original position.
Exercise 4
- Open both knees to the sides, leaving the feet on the ribs.
- You can swing your arms slightly to the sides, allowing your inner thighs to relax and release your legs down to the mat.
- Make sure that in this position your lower back does not round, so that it, like the lower ribs, is always pressed against the mat and an arch does not form.
- Relax and take two deep cycles of breathing: inhale through your nose and exhale through your mouth, and then lift your legs up.
Exercise 5
The next exercise is a slightly more complicated version of the previous one, that is, if you feel that you need to work a little more, then stay in this position. When you have good control of the pelvis and your hip joints are easily torn, then:
- Raise your legs into a tabletop position.
- Point your toes towards you, as if pushing the wall in front of you with your feet.
- Keep your back pressed against the mat.
- Keep perpendicular to the floor.
In this position, you need to keep your legs well, that is, it should not be hard for you and your back should not be rounded. The back is straight, the legs are at an angle of 90 degrees.
Interesting on the Topic How to Lose Weight Safely and Naturally: Your Complete Plan
It is from this position that you begin the same opening of the hip with inhalation, and with exhalation, turn the leg to its original position. Be sure to keep your back straight and do not lean your pelvis to either side. Keep your legs open easily, so let go of your inner thighs. Help yourself with your hands, because this is the main support that helps the pelvis not to fall to the side. So do not be afraid to lean on them, push off, well pressing the entire surface of your hands to the floor. Do a few more rounds of this exercise.
Exercise 6
- From the same position, start drawing a circle with your feet from the outside to the inside.
- Keep your pelvis stable. If it crunches a little, focus on your feelings: with a strong crunch or pain, do not perform this option, but do the previous exercise or rest altogether. When the crunch is not strong, you can continue to perform.
- You can also change the amplitude to a larger or smaller one. Everything depends on your feelings. The main task is to move your hip joints (imagine how they are now moving in a circle).
- Change direction and draw a circle from inside to outside.
- Do a few rounds of the exercise.
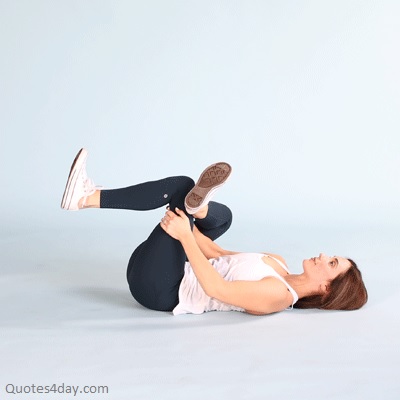
- Leave your legs in the center, pull them to the sternum, and rest with rolls to the right and left.
Exercise 7
- Turn to the left side, bend your knees, and put your head on your shoulder.
- Make sure your feet, pelvis, and shoulders are in line. You can lie on the edge of the rug to make it easier for you to navigate.
- In this position, fall through the lower back and tear off a little, pulling the pelvis to the right.
- Get out again and get off the floor.
- Next time, leave the pelvis in the center, between these two options, so that there is a small gap on the left side. You don’t need to bend too much, just enough so that you feel it and both sides are stretched enough.
Exercise 8
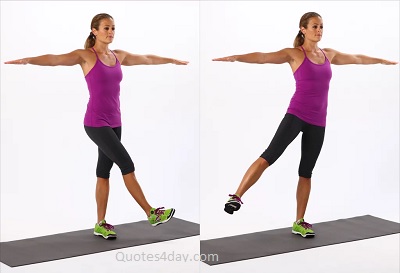
Right palm in support, from this position, do the exercise side lying :
- Raise your right leg to parallel with the floor.
- Reach behind your heel and then behind your toe. Yes, alternate the position of the foot several times.
- Leave the toe extended through the center of the foot.
- In this position, imagine that you have a glass of water on your knee and you move it very carefully in one plane, bending your leg at the hip joint.
- Exhaling, stretch the leg back along with the pelvis.
- Again, continue very carefully, carrying the glass of water into the flexion and exhaling into the extension.
Please note that your lower back, as in a corset, is tightened and does not move at all. Your task is to separate the movement of the leg from the rest of the body. Take a deep breath in through your nose as the leg moves forward and out through your mouth as the leg moves back. Repeat the exercise cycle several times. Hold the position at the end.
Exercise 9
Gently rise, leaving support on your left hand, and sit in the zet seat position – your knees are in line, and your right foot is behind. Stretch your arms to the sides, stretch your crown to the ceiling, and buttocks pressed to the mat:
- With an inhalation, tilt to the left, rise and once again leave support on the left hand.
- Stretch the right side, fill it with air, and stay in this position.
- Straighten your shoulders, point them away from your ears, and reach diagonally behind your little finger.
- With an exhalation, straighten up into a straight line and again go into a slope, stretching the right side.
- Rise up and shift your weight to your shins and return to your buttocks. Rock back and forth like that.
Exercise 10
Without changing position:
- Push yourself up, reaching out behind the palm, and feel how you stretch from the knee along the entire diagonal line.
- With an exhalation, bend and sit in the starting position.
- Repeat the exercise three more times: inhale – stretched, exhale – return to a sitting position.
Change position to the other side and repeat exercises 7-10.
When performing these exercises, it is important to learn how to move separately with all parts of the body, because the lower back, as a rule, takes on a large load. Instead of moving the leg, turning on the buttocks and hips, it is the lower back that turns on and there is too much tension in it, hernias, protrusions, and other problems can occur. Therefore, it is very important to learn how to move correctly so that it helps to maintain health.
FAQs
What are joint mobility exercises?
Joint mobility exercises are movements that aim to improve joint health, flexibility, and range of motion.
How often should I do joint mobility exercises?
Ideally, you should incorporate joint mobility exercises into your daily routine to maintain your joint health.
Are joint mobility exercises safe for everyone?
It’s always best to consult with a healthcare professional before starting a new exercise routine, especially if you have pre-existing conditions.
Can joint mobility exercises help prevent injury?
Yes, joint mobility exercises can help prevent injury by improving flexibility and range of motion.